- Quick Guidelines
- Resolution
- Colour Space
- Accepted File Formats
- Bleed
- Foil Stamping
- Spot UV
- Foil & Print Registration
- White Ink
FILE SETUP GUIDE
To help you create your print-ready artwork, we have created this guide to explain the essential requirements. It is important that your designs meet these requirements, or your order may be delayed whilst we ask you to make file corrections.
If you are unsure about your artwork or have any questions, you can reach out to us at any time and speak to a member of our artwork team. Emails are monitored 'after hours' during evenings and at weekends, so you will receive a swift response to your query. Every order that is placed with us also undergoes a full artwork check prior to us sending you a proof for approval. If you are struggling with your artwork file, we can also assist by redrawing low resolution files and amending designs to ensure they are print-ready, however this service carries an additional charge, depending on the time required.
QUICK GUIDELINES
FOR FULL COLOUR PRINTING
Please supply a PDF or JPEG at 300dpi resolution, in CMYK colour format with 3mm bleed. Crop marks are not necessary but can be included. Using the blank templates we have provided via this site will ensure the dimensions are correct, so we are able to process your order as quickly as possible.
FOR FOIL BLOCKING
We only accept vector files supplied as PDF or AI/EPS files with all fonts outlined for foil blocking. Foil blocking artwork should be supplied in 100% black (key). If your design has multiple foil colours, please supply multiple files in 100% black and name them according to the foil colour to be used. If your design also has digital printing then the file for this should be supplied separately without the foil artwork. The positioning of the artwork for foiling should be relative to its position on the print file. You can also supply a mockup file if you wish showing the print and foil combined, however, this is not necessary as our artwork team will create this during the proofing process. Please make sure you design with a little tolerance for mis-registration between print and foil stamping. Foil stamping is a separate print finishing process carried out after printing, and registration can vary by ±2 mm. This means you should expect the foil stamp element(s) to move around the page by up to ±2 mm. If your design requires close registration of foil effects and digital printing, we recommend our raised digital foiling as the best option for your project/design. Because the process is digital, we are able to achieve much closer registration of foil effects and printing.
DOWNLOAD EXAMPLE FILEFOR SPOT UV/RAISED DIGITAL FOILING
Please supply a full colour CMYK print file with 3mm bleed for full colour printing and a separate Spot UV vector file created in 100% black (key). The position of the artwork for spot UV should be relative to it's position on the print file. Please make sure you design with a little tolerance for mis-registration. You should expect the spot UV element(s) to move around the page by up to ±1 mm. Spot UV works best when it is not registered with printed elements and instead treated as a design element in it's own right.
DOWNLOAD EXAMPLE FILERESOLUTION
Resolution refers to the number of 'dots' that will be printed in an inch (i.e. the quality of an image).
RESOLUTION FOR FOIL STAMPING & SPOT UV
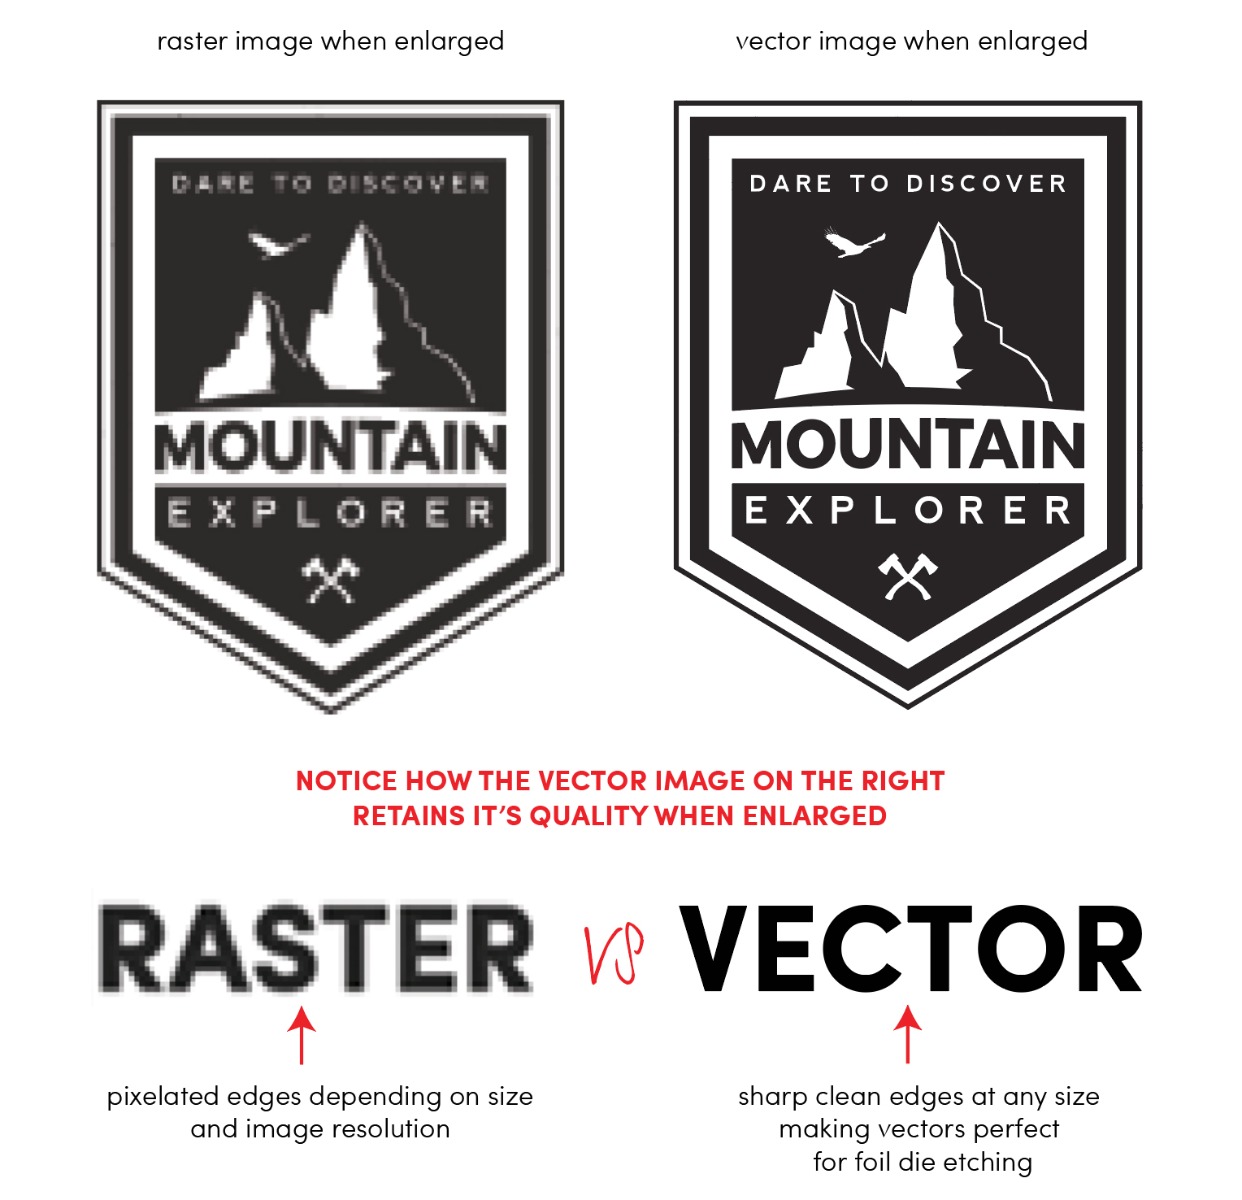
When creating artwork for foil blocking (or spot UV), we recommend using vector software such as, Adobe Illustrator or Affinity Designer to create vector art. Vector software uses mathematic equations and geometric primitives (points, lines and shapes) instead of pixels, which form raster based images. Because of this, vector art can be scaled infinitely, without any loss of quality of fidelity, whereas raster (pixel) images become more blurry and pixelated the more they are enlarged. Vector artwork is ideal to manufacture the metal dies/blocks required for f. Etching foil dies from pixel based files can result in jagged edges and poor quality prints.
If you don't have access to vector software or don't have your design ready in vector format, our Art Team can prepare or recreate your files for you for an additional cost or you can work with a designer/agency of your choice, simply refer them to our website to ensure they create files in the format we require.
IMPORTANT: Placing a raster image such as, a JPEG inside Adobe Illustrator and saving the file as a .Ai or .EPS file doesn't make the image a vector graphic/file. The image/design must be created using the vector editing tools so it is true vector art.
RESOLUTION FOR FULL COLOUR PRINTING
For best results, print files should always be set at 300dpi. If you are using Adobe Photoshop to create your print-ready artwork, it is imperative that you select the correct resolution before beginning the design. When creating a new document, you will be directed to the “New Document” window. Be sure to set the file to the correct size and set the resolution at 300 pixels/inch.
If you are using Adobe Indesign, Illustrator or Quark and importing images into your layout, it is important to ensure that the images are of high enough resolution at the size you are using them. To check the resolution of an image, open it into Photoshop and select Image > Image Size. You will then be directed to the image size window, where the information you require will be displayed.

COLOUR SPACE
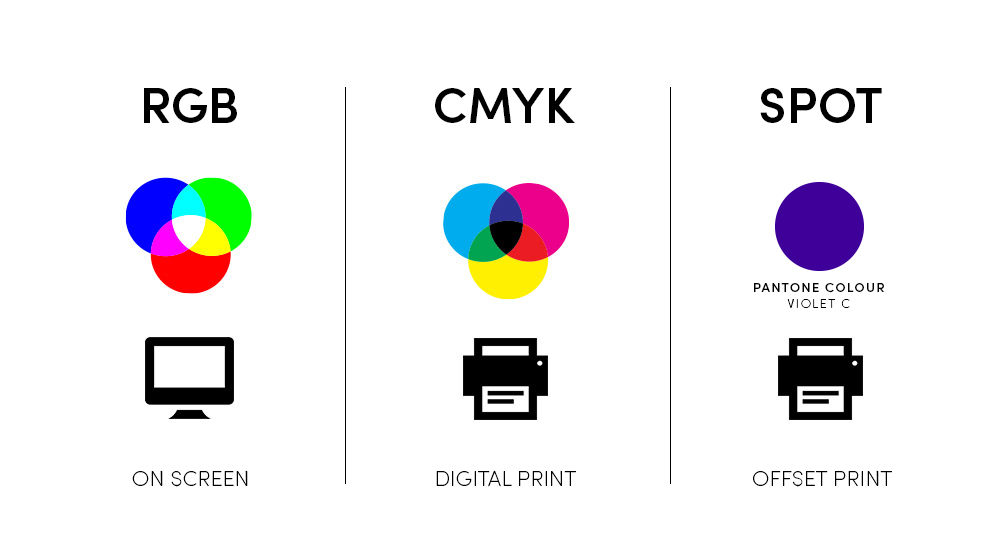
There are two main colour spaces which you will find in most design software. These are CMYK and RGB. CMYK stands for Cyan (C), Magenta (M), Yellow (Y) and Black (K) and is for print use, whilst RGB represents Red, Green and Blue and is used for screen or web applications.
All artwork for full colour printing, MUST be supplied in CMYK colour format, as these are the colours that combine to create full colour print. Any artwork that is supplied in RGB format or as pantone colours will be converted to CMYK, but please note that, the colours may change when this conversion is carried out. Brighter colours will be the most affected. Ideally, the artwork should be created in CMYK format from the outset, rather than being converted later in the process. If you are concerned about colour reproduction, we can supply GMG colour proofs for an additional cost.
You may also see CMYKW mentioned on our website. The "W" refers to White ink being used as a spot colour. This allows us to print white ink and full colour (with white behind) on coloured media.
ACCEPTED FILE FORMATS
IMPORTANT: Files supplied for foil stamping or spot UV must be supplied in vector format. They can be sent to us as Adobe Illustrator files or as PDF files, but the artwork must have been created as vector art using vector editing tools (not JPEGs placed in Illustrator and saved as an .Ai or .EPS file). Only artwork originally created in a vector editing program, such as Adobe Illustrator, is truly vector art.
PDF files are our preferred file format. You can export PDFs from nearly all design software as well as from MS Office. When exporting as a PDF for general printing, please ensure all images have an original resolution of 300dpi and 3mm bleed. Your file should also be created in CMYK colour space. If you are exporting as a PDF for foil blocking, your artwork must be created in vector based software such as Adobe Illustrator or Affinity Designer.
EPS
When supplying EPS files, make sure that all fonts are embedded or outlined and that you include document thumbnails. All files should also be in CMYK colour mode and have 3mm bleed applied. EPS files are vector based and can be scaled infinitely, without any loss of quality of fidelity. This makes them ideal for foil blocking, however, just because a file is saved in one of these formats, does not mean that it is truly vector art. Sometimes, people open raster files in vector software such as, Adobe Illustrator and re-save the file in a vector format, without recreating the art using the vector editing tools. Only art originally created in a vector editing program, such as Adobe Illustrator, is truly vector art.
JPEG/TIFF
By default, each time you save and reopen a JPEG, the quality reduces. If you are sending us a JPEG, please ensure you select MAXIMUM quality. JPEG/TIFF files for general full colour printing should be 300dpi. We are unable to accept JPEG or TIFF files for foil stamping or spot UV. JPEG and TIFF files must be recreated as vector files first.
PHOTOSHOP FILES (.PSD)
We are able to work with PSD files. Please ensure all layers are named accordingly and that the resolution is set to 300dpi for general full colour printing. 3mm bleed must also be included and the Photoshop document should be set to CMYK colour mode.
ILLUSTRATOR FILES (.AI)
If you are supplying Ai files, please ensure that all images are embedded (you will be prompted when importing images) and all type is converted to outlines (select all type, then choose the Type menu at the top of the screen and select Create Outlines). We recommend saving a backup copy of your Illustrator file before converting text to outlines, because it will make the text in your original file uneditable if you save it. Please also ensure that, the document is in CMYK colour mode and has all relevant bleeds. You can set up your artwork on different layers (named accordingly) or as separate art boards.
MICROSOFT OFFICE
We do not accept Microsoft Office files. Please convert your MS Office documents to PDF files.
BLEED
Bleed is an essential part of creating artwork for print. Professional designers will always extend (or 'bleed') background elements and images beyond the edges of the document by an additional 3mm. This prevents unwanted white borders around the edges of a printed document and allows for movement during guillotining.
Commercial printing presses are no different to your desktop inkjet or laser printer, in that, they cannot print to the very edge of a sheet of paper. To work around this problem, we print your design onto a larger sheet of paper and then cut it down to size. Most conventional and digital printing presses suffer from slight sheet-to-sheet mis-registration. In other words, due to slight movement as the paper passes through a press, your design may not be printed in exactly the same position on every sheet of paper. We're not talking about much - less than a millimetre. Also, when the guillotine operator is trimming your design down to size, it is not possible to cut exactly along the edge of your design.
To rectify this issue, designers use bleed. This simply means that, they extend beyond the edge of the document (by between 3mm and 5mm) any elements which should touch the edge of the paper. As a result, any inaccuracies which occur during the printing or finishing process, shouldn't cause any problems.
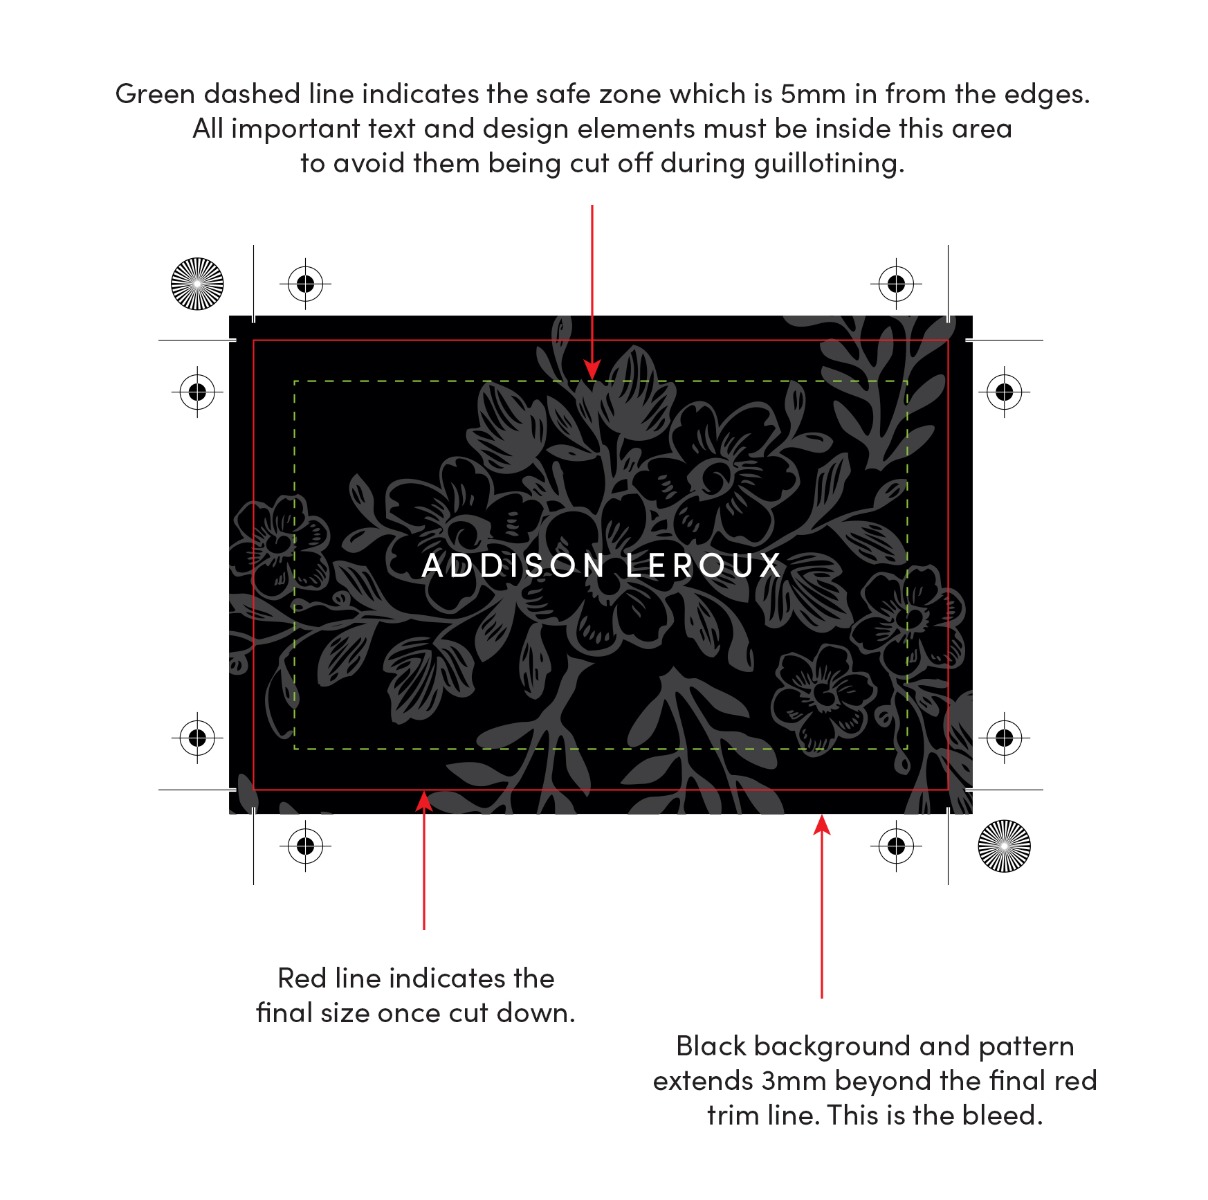
What this boils down to is, making your artwork slightly larger than necessary, so that it can have an extra 3mm all the way around, and making sure there is nothing that needs to be printed in this area (e.g. text) but that it will still look acceptable if it is printed (i.e. it is a continuation of the background colour/image). For example, if you are creating an A5 file, the final size will be 210mm x 148mm, once it is trimmed down. When creating artwork, you should add 3mm bleed to all edges, meaning your final document size would be 216mm x 154mm. We also recommend keeping all important details 5mm in from the edges, in what we call the 'safe zone.' Our templates show both the final size, along with bleed and safety margins, so we recommend downloading them prior to creating your artwork.
FOIL BLOCKING
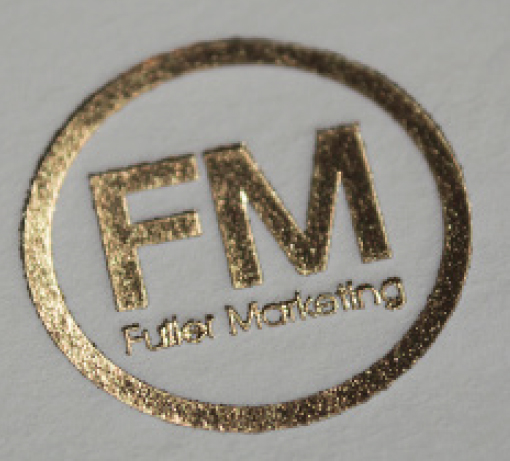
Foil blocking/stamping requires metal dies like the image to the right to be etched using your supplied artwork files. Etching dies from raster (pixel) images can often result in jagged edges, especially with fine lines and small text. To ensure the quality of both the dies and our foil stamping, we only accept vector files created using vector editing software such as Adobe Illustrator or Affinity Designer. Vector software uses mathematical equations and geometric primitives (points, lines and shapes) instead of pixels to create artwork. Because of this, vector art can be scaled infinitely, without any loss of quality of fidelity. This makes it ideal to manufacture the metal dies/blocks required for foil blocking and creates the highest quality foil finish. In order to price your job we will need to know the size of the foil area which you can work out by reading our how to work out your foil area blog post.

HOW TO SUPPLY YOUR VECTOR FILES
FOIL ONLY ON WHITE/COLOURED STOCK
If all of your design is in foil on a white or coloured card stock that doesn't require digital printing, you can supply us with one file, with your artwork for foil blocking in 100% black.
DOWNLOAD EXAMPLE FILEMULTIPLE FOILS
If your design features multiple foil colours, please supply multiple files in 100% black (or one file with multiple pages or Illustrator art boards) and name them according to the foil colour that should be used.
DOWNLOAD EXAMPLE FILEDIGITAL PRINTING & FOIL STAMPING
If your design requires digital printing AND foil blocking, you should supply two files of identical dimensions, one file for full colour digital printing in CMYK colour format with 3mm bleed and 300dpi resolution and one vector file for foil stamping. Everything on the foil stamping file should be 100% black and should be placed relative to where it should appear on the digital print file. Please make sure you design with a little tolerance (±2 mm) for mis-registration between print and foil stamping. See the Print & Foil Registration tab for more information.
DOWNLOAD EXAMPLE FILETIPS & GUIDELINES FOR FOIL STAMPING
FILLING IN
‘Filling in’ involves the foil bridging the gaps between text or other artwork elements. To avoid this we recommend the following:
1) Keep your font size at a minimum of 8pt (the larger the better though!).
2) Adjust your kerning. Ensure adequate space between letters, especially when fonts are small.
3) Avoid combining large solid area of foil with thin foil areas and/or small text. More heat/pressure will be required for larger foil areas which can cause thinner areas and small fonts to fill in.
4) Ensure thin lines are a minimum of 0.5pt, however thicker is always better.
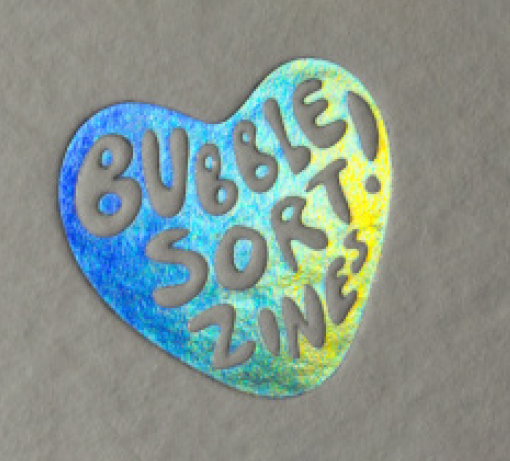
FOIL 'KNOCK OUT'
A popular way to utilise foil is to have a solid foil area with the text or an artwork element ‘knocked out.’ This is a great way to make use of a single foil colour, but it’s important to keep the area that will be ‘knocked out’ fairly large. Small text and fine lines won’t work, as they will simply ‘fill in’ when the foil is applied.
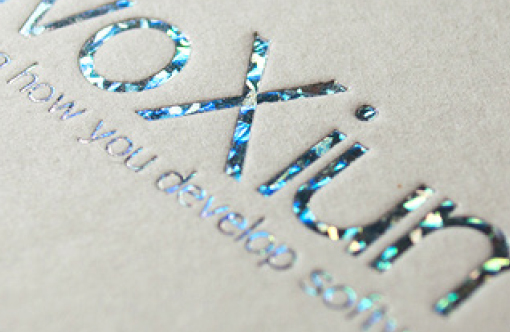
SPECIAL EFFECT FOILS
We have a range of special effect foils which we don’t promote on our website. These include; brushed foils, patterned foils, patterned holographic foils and colours such as holographic gold and holographic pink. Reach out to us if you'd like to use a special effect foil for your project.
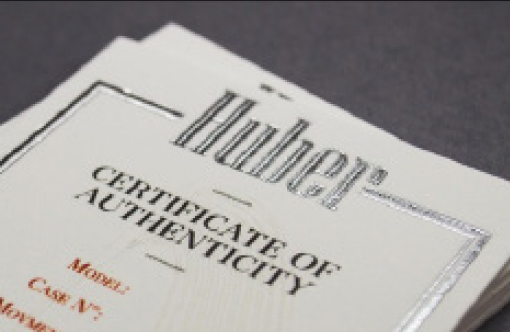
BORDERS
It’s nearly impossible to keep borders all perfectly level, which is why we don’t recommend them. With that being said, if you decide you absolutely must keep your borders, then here are a couple of general guidelines to follow:
1) Ensure borders are 5mm in from the edges of the card. This will help us minimise any discrepancies during guillotining. Having border 1-2mm from the edges makes it much more obvious if they are slightly uneven.
2) If your border is being foil blocked ensure the border stroke is at least 1pt, and be aware that due to the nature of foil blocking your border may appear slightly thicker and/or thinner in some parts.
SPOT UV
IMPORTANT: Please make sure you design with a little tolerance (±1 mm) for mis-registration between print and spot UV. This means the spot gloss varnish may not perfectly register on top of printed elements. Spot UV works best when it's treated as it's own separate design element.
When creating artwork for spot UV, you should supply two files of identical dimensions, one file for full colour printing and one for the spot gloss artwork. Everything on the spot gloss files/layer should be 100% black and should be placed relative to where it should appear on the print files. All files should include 3mm bleed. Please keep in mind, that fine lines (below 1mm) and small text cannot be guaranteed to come out in spot UV. If you area reversing out the effect (solid spot UV area with lines/text inside not in spot UV), please ensure they are a minimum of around 2pt thickness to prevent them potentially 'filling' in with the spot varnish.
DOWNLOAD EXAMPLE FILEFOIL & DIGITAL PRINT REGISTRATION
IMPORTANT: Please make sure you design with a little tolerance for mis-registration between print and foil stamping. Foil stamping is a separate print finishing process carried out after printing and registration can vary by ±2 mm. This means you should expect the foil stamp element(s) to move around the page by up to ±2 mm.
Most conventional and digital printing presses suffer from slight sheet-to-sheet mis-registration. In other words, due to slight movement as the paper passes through a press, your design may not be printed in exactly the same position on every sheet of paper, we're not talking about much, usually less than 1mm. Once your job is printed, it then moves to our foil presses. The foil presses also suffer from slight sheet-to-sheet mis-registration. Some jobs may also be guillotined down prior to foiling. In addition to this, there can be some sheet shrinking during printing and metal foil dies will expand slightly when heated. For these reasons, we don't recommend creating artwork that requires tight registration between elements that are digitally printed and elements that are foil blocked. We recommend keeping digitally printed elements and foil elements separate. If your designs require very close registration of different colours, we recommend producing the design either completely in print or completely in foil so that only one printing process is used, which will help minimise registration issues. Our designers will guide you with your files if you are unsure, we'll also advise as to any potential issues prior to running your job.
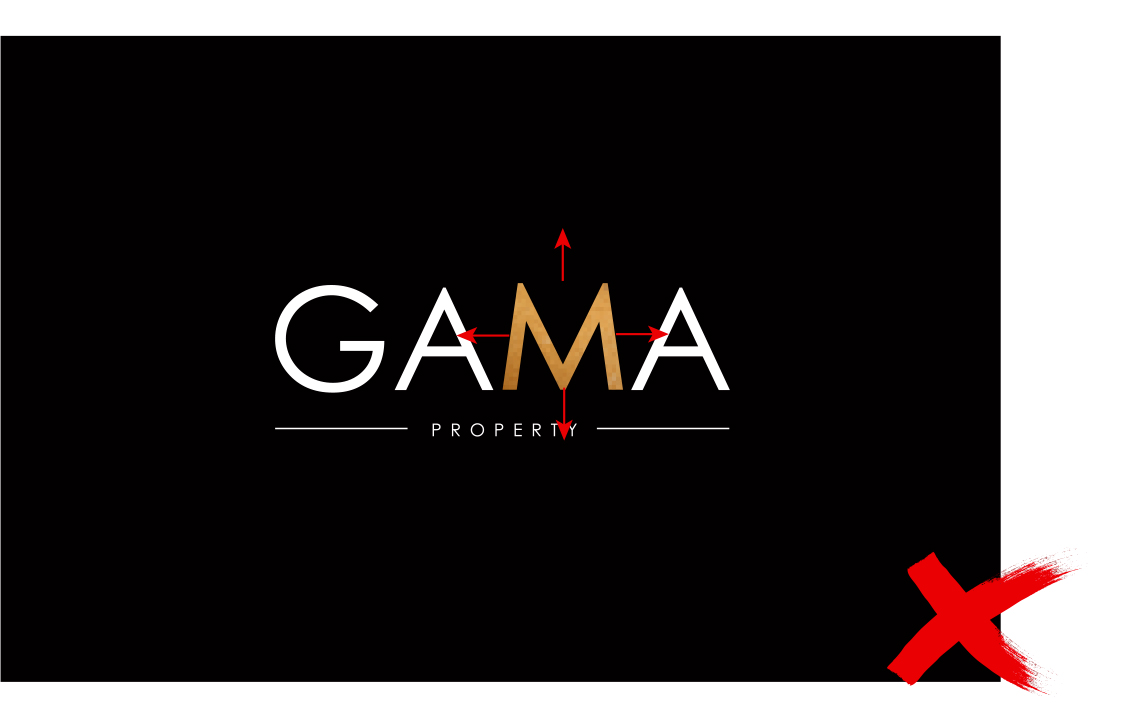
Allowing for mis-registration the gold foil ‘M’ will move up, down, left and right around 1mm during the foil blocking process. Due to it’s tight registration with the rest of the name, it is very noticeable so we don't recommend designs like this. Alternative solutions would be having the whole name in gold foil or the whole name left white.
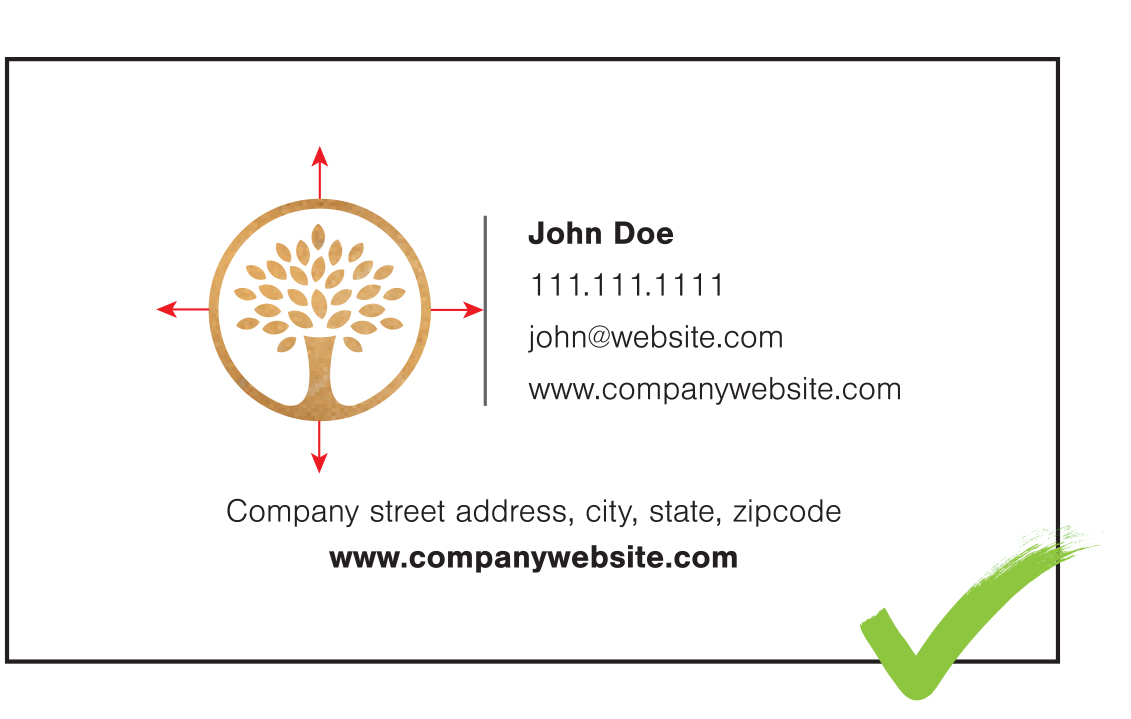
This design is ideal for foil blocking and printing, because it doesn't require completely accurate registration with the artwork elements that are digitally printed.
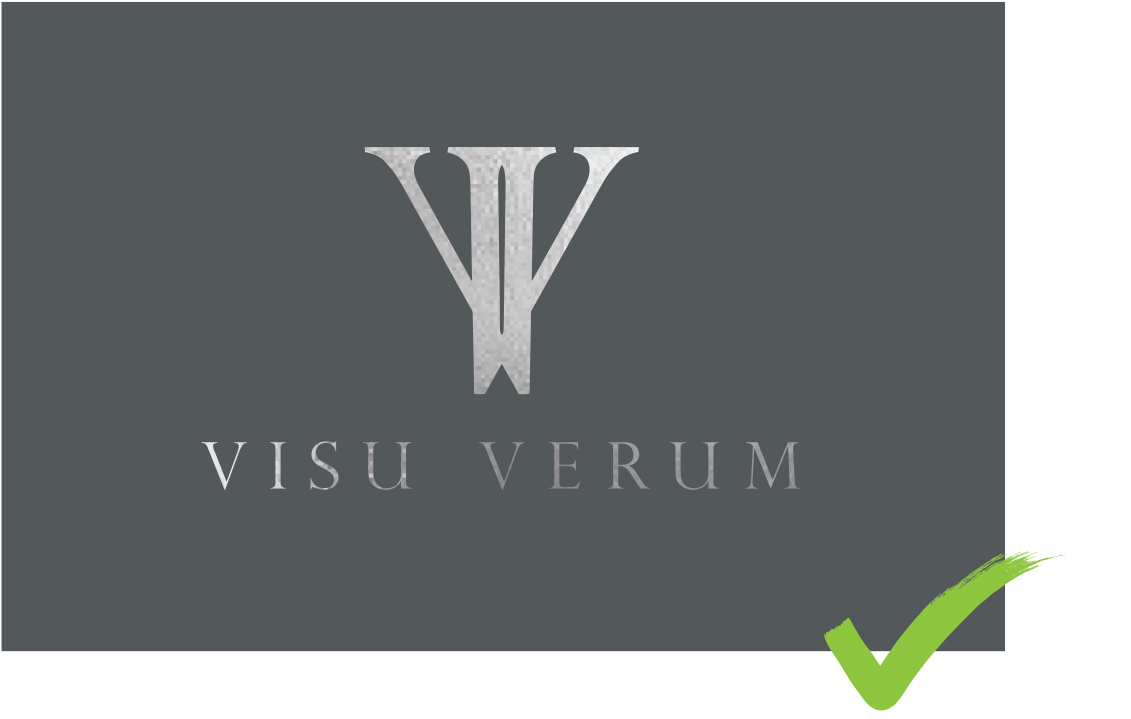
This design is perfect for foil blocking. The logo is in silver metallic foil on a printed grey background. There are no registration issues and the final result looks great.
Just remember...
Think about your design and consider whether it will be noticeable if the foil stamp element(s) move around the page by up to ±2 mm. The image below gives an example of the variations you may get during a print run. You can also reach out to us using the Help Desk in your account area and get advice on your file from our Artwork Team.

WHY USE WHITE INK?
The foundation of digital colour printing is based on applying CMYK (Cyan, Magenta, Yellow and Black) toners onto white paper. The white paper reflects a wide range of colour back to your eyes. When printing CMYK toners on to darker papers only a narrow range of coloured light is reflected back to your eyes, which results in dark and dull results. When white toner is laid down underneath colour toners, it provides a protective reflective surface similar to white paper. This creates bright vibrant colours on any coloured papers and means you don’t need to start with white paper, the door is now open to using coloured, metallic, pearlescent, coloured, kraft, black and many more papers.
PRINTING WHITE TONER ONLY
Applications: Photoshop, Illustrator, InDesign, Word
Using this technique, white and transparent areas will be ignored completely. Darker areas of your design, whether in greyscale or full colour, will be printed with a higher density of white toner while lighter elements will be printed with less. If you’re using text and/or vector elements, simply create your design in Illustrator or InDesign and work using black to represent white. Microsoft Word can also be used to create artwork for white toner only printing.
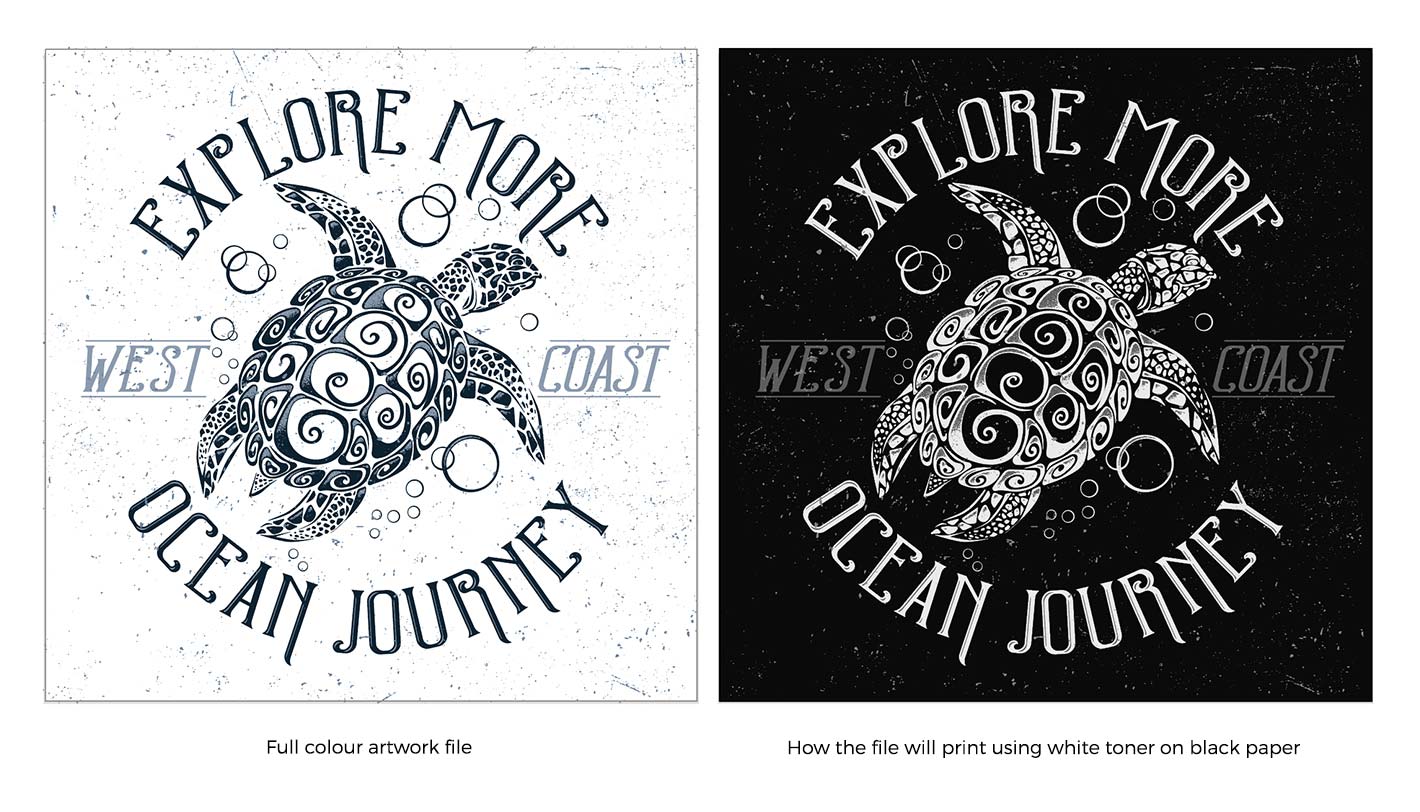
Printing black and white photographs using white toner is also very easy. Simply open your photo in Photoshop and select "Image > Adjustments > Invert." 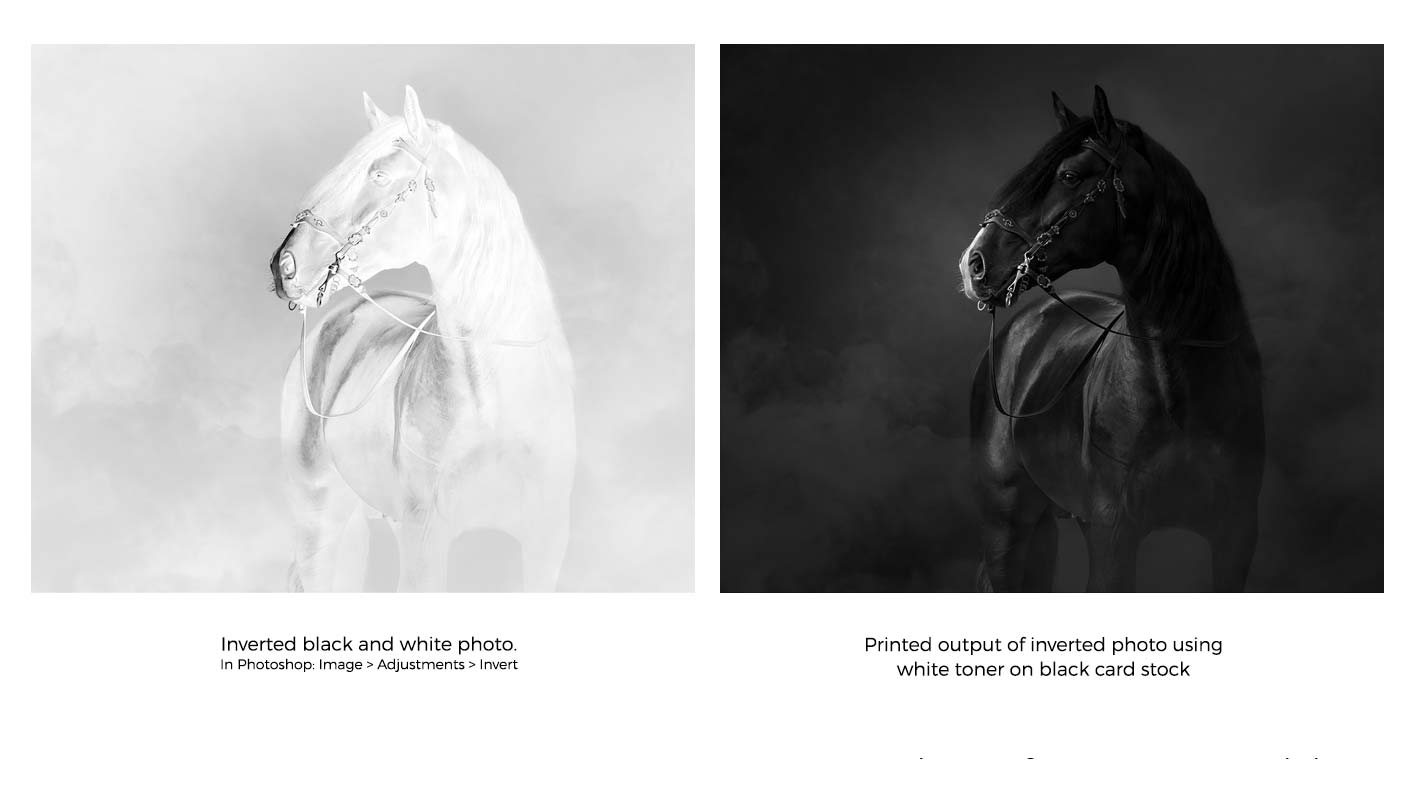
PRINTING WHITE TONER UNDER COLOUR
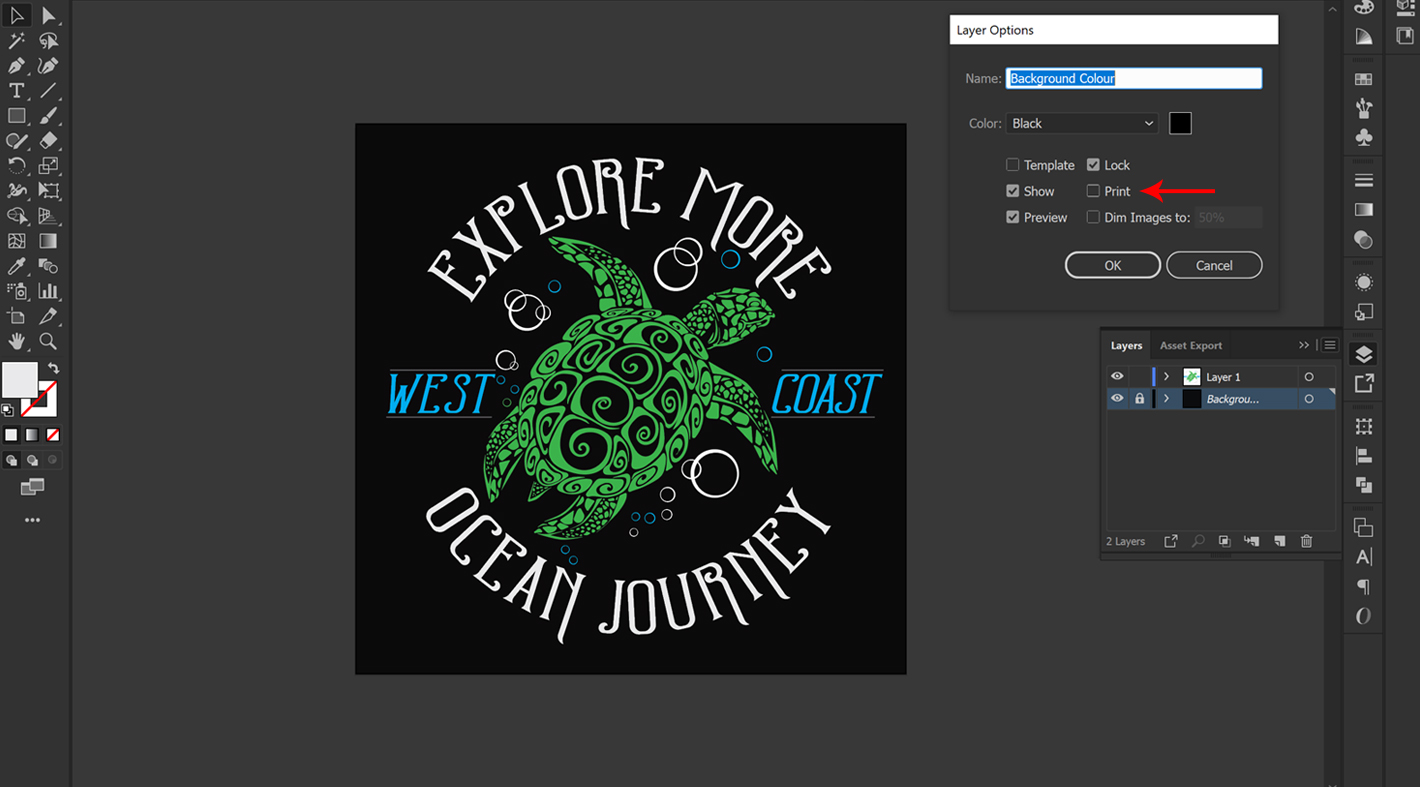
The easiest way to set up your file for white behind colour, as well as, standalone white elements is by using the white swatch in Illustrator. This approach doesn’t allow for gradients of white and will layer 100% white behind every colour (plus white elements) except true black (100% K). TIP: You can use a rich black made from CMYK, however, be sure to set the K value to 100% to ensure white isn’t printed underneath it. We recommend creating a layer and filling it with the media colour you intend to use. You can then turn "Print Off" under the "Layer Options" and then lock it. Create a new layer and create your design using colour swatches and the white swatch. When you’re finished, export your file to PDF-X-1a. This is all that’s required for simpler designs that combine both white and colour elements. If you need greater control over the white toner, such as gradients, then you'll need to use white as a spot colour channel which is explained below.
PRINTING VARIED WHITE TONER UNDER COLOUR
Application: Illustrator
If your design requires use of white gradients and tints or if it requires elements with a percentage of white less than 100% underneath (or no white at all), then you’ll need to create a spot colour to enable full control over the white toner. To create a spot colour swatch, go to "Windows > Swatches" to open the swatch panel. Click the 3 horizontal lines in the top right of the swatch panel and select "New Swatch" as shown below. Name the swatch "SpotWhite" and set the Color Type as "Spot Color." You can either leave the colour for the spot channel as white or select another colour that won’t be used in your design. Leaving it white is useful, however, be careful not to confuse it with the standard white swatch. We prefer to set the spot white swatch up as 100% magenta.
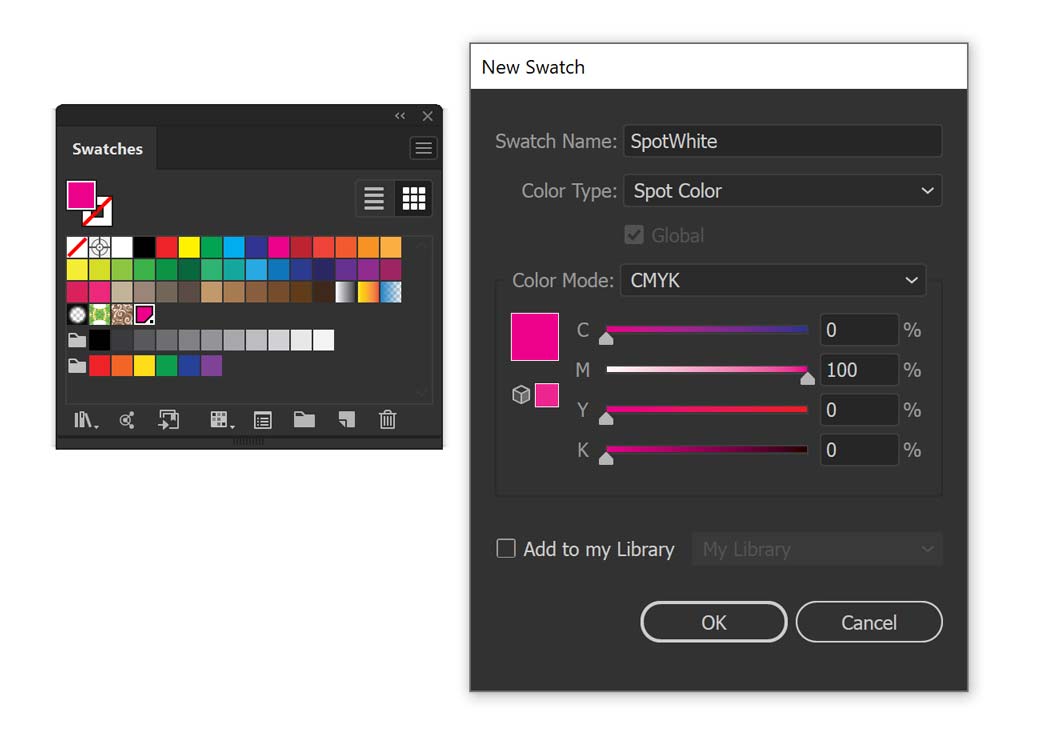
Create a new layer and fill it with the media colour you intend to use. You can then turn "Print" off under the "Layer Options" and then lock it. Create a new layer and name it, ‘Colour Elements’ and start creating your design. Wherever you wish to use standalone white elements, be sure to use your new spot colour swatch.
When you’ve completed your design, you’ll need to make a new layer that contains spot colour white elements to print under your colour elements. There are several ways to achieve this, but the simplest is to duplicate your coloured elements layer and name it, ‘White Elements.' Then, delete all elements except those whose colours you want to preserve with white. Convert all remaining elements’ fills and strokes to the SpotWhite swatch.
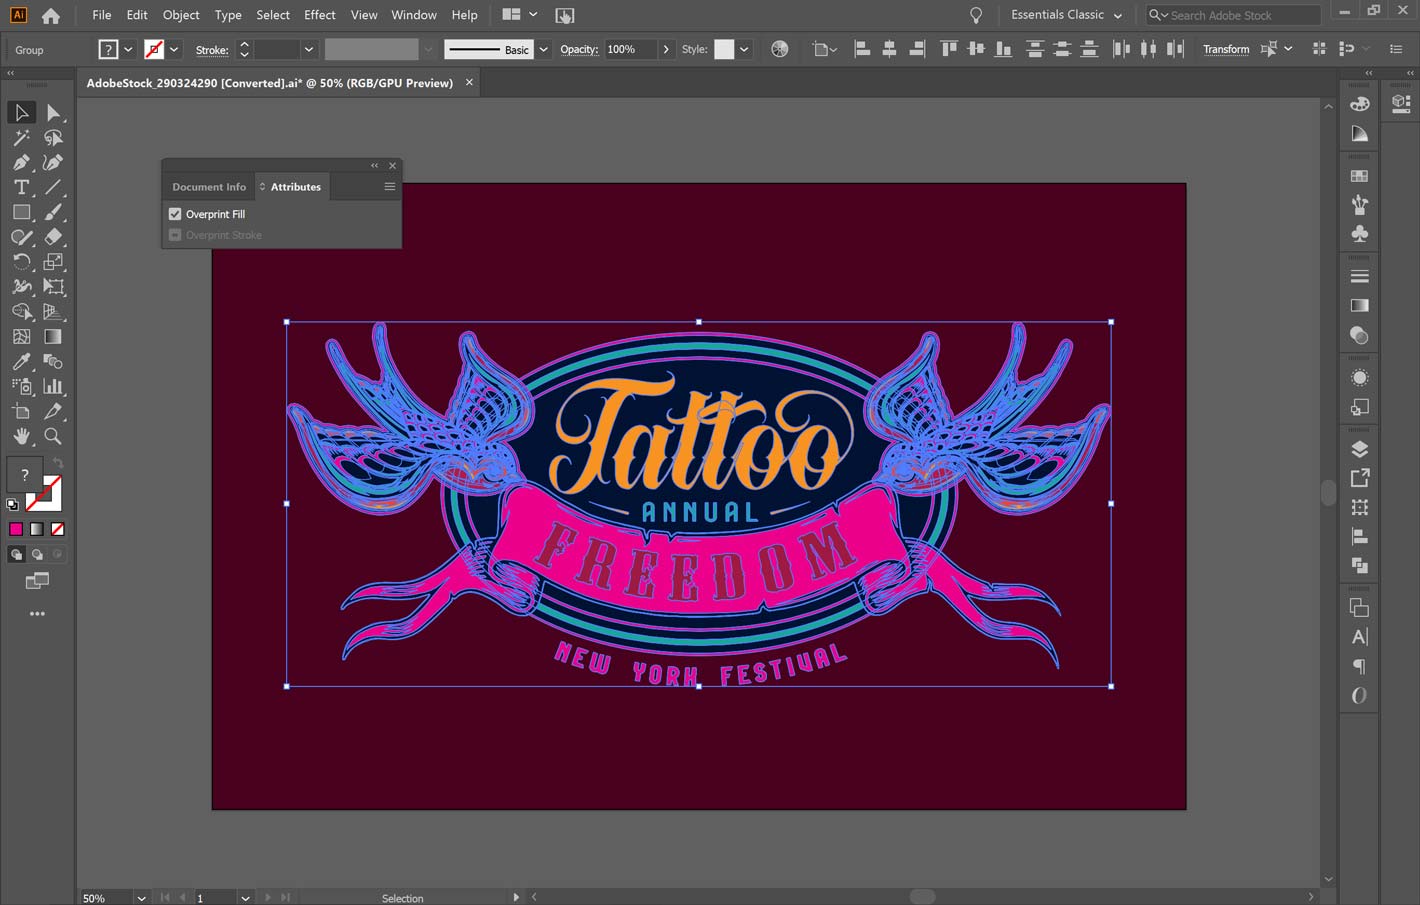
Next, and most importantly, under "Attributes," set "Overprint Fill and Overprint Stroke" (when a stroke is used) to "On" for all of the elements on your White Elements layer. This will prevent these white elements from knocking out the coloured elements, instead allowing both white and colour to print.
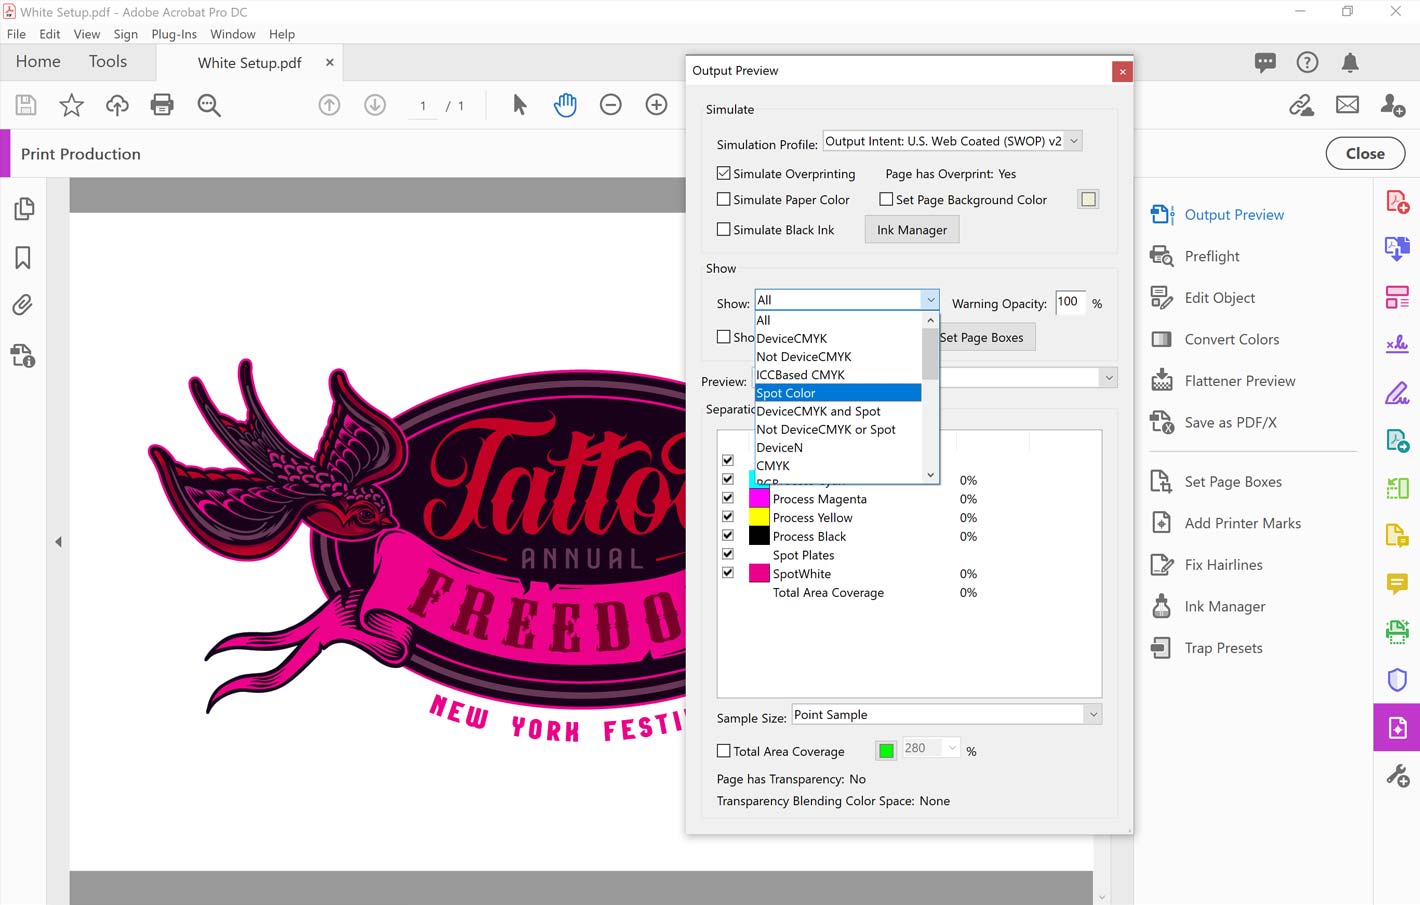
Once you’ve finished, export your file to PDF X-1a and open it in Adobe Acrobat. If you're using Acrobat Pro, you can open up the "Print Production Tools" and access the "Output Preview," where you can check the output of CMYK, spot white and All (see images below) to ensure everything is correct.
If you're unsure or need help, please reach out to our Artwork Team by submitting a ticket using the Help Desk in your account area. They'll be happy to help!